Camera And ND Filter Math

(Click to enlarge/purchase)
Neutral density (ND) filters are used extensively in making long exposure photos. They create wonderful images with smooth water and streaky clouds in the sky. However, you might need to do some camera and ND filter math when using them. It’s not overly difficult but can be cumbersome when trying to set up gear while figuring out the settings.
We’ve all heard of the exposure triangle where we balance our desired setting of shutter speed, aperture, and ISO to get a good exposure. We’ve been spoiled by our technology. The camera’s metering system makes it easy to make the needed trade-offs without needing to know a lot about the underlying math. Via the metering system I can see the effect of adjusting any, some or all of those 3 elements and quickly balance them to get a good exposure. The problem with long exposure shots is that once you hit a shutter speed that puts you into Bulb mode, you’re on your own. The metering system won’t help you here. This is where you have to do some camera and ND filter math.
ND Filter Basics
ND filters are essentially darkened glass that limits the amount of light reaching your camera sensor. In order to get the same exposure as a shot without an ND filter you have to adjust your camera settings. Often the setting is solely increasing the exposure time. However, sometimes it is made in conjunction with aperture and ISO changes. Filters are offered as either circular filters that simply screw on to the end of your lens and filter systems that allow you to slide glass plates into a frame mounted on the end of your lens.
It is possible to stack filters to increase the density although there are some downsides you need to consider. First, every piece of glass you put in front of your lens increases the risk of diminished image quality which is why you want to invest in good quality filters. Second, stacking filters, especially circular filters can lead to vignetting as they can restrict the field of view of your lens. So, while it is possible, for example, to stack a 1-stop and 2-stop filters together to get the exposure equivalent of a 3-stop filter you are better off using a single 3-stop filter.
The Simple Approach
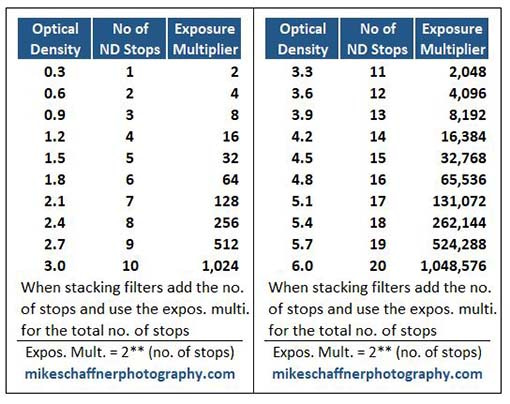
Listed below is the basic information of various ND filters up 20 stops in optical density. If the only way you use ND filters is to solely adjust the exposure time this is the only table you need. I’ve listed the optical density factor not because you’ll need it in your calculations but you may need it to identify that you’ve used the filter you intended. There seems to be no standard way for manufacturers to label the filters. I’ve seen, for example, a 6-stop filter identified 3 different ways as: ND1.8, 6-Stop, and ND64. They all mean the same thing.

Let’s assume you get a good exposure at 1/15 sec., f/14, ISO 100 with no ND filters. If you want a 300 second (5 minute) exposure you would divide the desired time by the non-ND time (300 ÷ 1/15). This gives an exposure multiplier of 4,500. The ND filter (likely a combination of filters) with the nearest exposure multiplier to 4,500 is 12 stops with a exposure multiplier of 4,096. Multiply the actual exposure multiplier you will use by the original shutter speed (4,096 x 1/15). You will find the time that you need with 12 stops is 273 seconds (4 minutes 33 seconds). Thus 1/15 sec., f/14, ISO 100 is equivalent to 273 seconds with 12-stop ND, f/14, ISO 100.
A More Complex Scenario
Let’s work through a more complex example. I like fine art architecture especially of the type that Julia Anna Gospodarou shoots. The settings Gospodarou prefers to use are an exposure time of 5 to 7 minutes (closer to 5 preferred), aperture of f/5.6 to f/8 (f/8 preferred) and ISO close to 100.
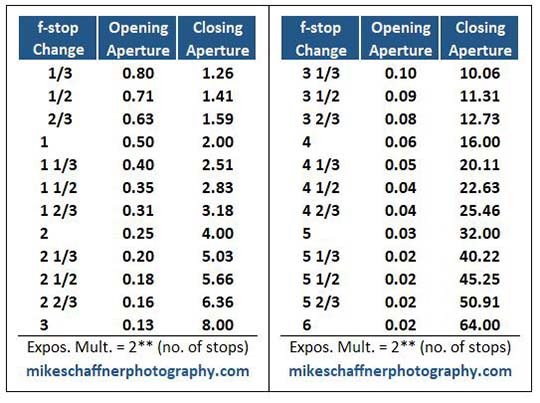
We’ll again assume that you determined the optimum exposure settings without ND filters to be 1/15 sec., f/14 ISO 100. How do we get closer to Gospodarou’s suggested settings? Let’s start by switching from f/14 to f/8. Using the table below we can see this is a change of 1⅔ stops.

Below we can see that the multiplier for opening 1⅔ stops is 0.31. Our time now goes to 85 seconds (273 x 0.31) which is way too short.

Since we opened up the aperture by 1⅔ stops we can compensate by adding 2 stops of ND filters (a net closing of ⅓ stop). This increases our time by a factor of 4 (doubles for each stop) bringing the time to 340 seconds. Finally, by increasing ISO to 125 we in effect open ⅓ stop and 340 sec. 14-stop ND, f/8, ISO 125 is equivalent to our original exposure of 1/15 sec. no ND, f/14, ISO 100.
Other Considerations
Don’t get too hung up on being exactly equivalent particularly with longer exposures, e. g., 5+ minutes. Over that time the light in the scene changes even though we may not be conscious of it. This is especially true with cloudy skies. The exposure you really needed for the light over that longer period may no longer match your original short exposure time settings. Once you’ve taken the long exposure shot, check the histogram and make changes as needed for the changed conditions.
While the camera and ND filter math in the above example is technically correct, is it practical? Perhaps the depth of field is too shallow, then what do we do? What this means is that this may be an iterative process where we balance all the factors. It all comes down to a balancing act of the tradeoffs. We have to consider depth of field, noise, lens sharpness etc. in our decisions.
Download The Tables For Cheat Sheets
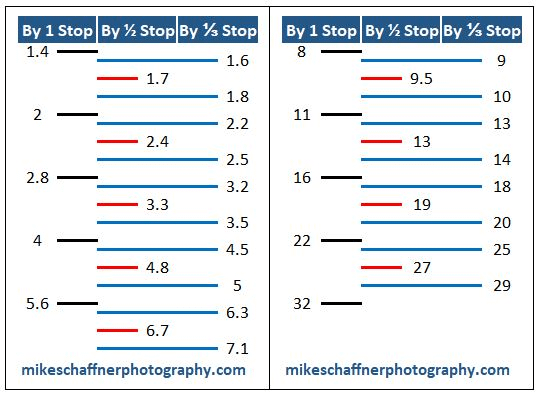
You’re welcome to download the tables to use as cheat sheets for doing camera and ND filter math. I’ve sized them so you can laminate them and slip into your wallet or camera backpack. They can make going through the math a lot easier and quicker than trying to do it manually.
Isn’t There An App For That?
Of course, there’s an app for that. For instance, the app that I like and use is Exposure Calculator by Mario Zimmerman. The Apple App store has this but I’m don’t know if there is an android version. If not, I would expect there is a competing app you could find.
This app allows you to see how various ND filters affect the exposure. You can change time, aperture, ISO (choose 2) along with your choice of ND filter. This allow you to see the equivalent exposure settings to your non-ND settings.
So why do you need the cheat sheets? Both work so it’s your choice between cheat sheets or app. For me the cheat sheets are a backup and a way to double check that my thought process is correct. The important thing is to have an understanding of the underlying concepts.
Bonus Tip
If you are going to buy circular ND filters don’t buy a set for each size (diameter) of lens. Instead buy a set for the largest diameter that you will need and then buy step-up rings that allow you to add the larger diameter filters on smaller diameter lenses. The step-up rings are the fraction of the cost of a good quality ND filter.
How do you calculate exposures when using ND filters? Please leave a comment in the comment box below.
