6 Ways To Get The Most Out Of Your Camera

Getting the most out of your camera is something that everyone with a DSLR or mirrorless camera strives for. These cameras are technological marvels. They can do amazing things. However, they do have limitations. The trick is to learn to fully utilize your camera’s full dynamic range and get as much detail at the extremes as possible. The goal is to capture and keep all that wonderful data our camera collects. If we get the most out or camera and keep it, we can get the most out of our photos.
If we get the most out or camera and keep it, we can get the most out of our photos.
Let’s start with what dynamic range is. Simply put, dynamic range in photography describes the ratio between the maximum and minimum measurable light intensities (white and black, respectively). It’s commonly expressed in “stops”, each stop representing a doubling of the light intensity (just like “stops” on our lenses). Human eyesight can see detail over approximately 30 stops of light. Modern digital cameras have a dynamic range of roughly 10 to 15 stops of light.
Our goal is to use the full 10 to 15 stops and to maximize the amount of data we collect. This gives us the most options and allows us to show detail at both extremes of light and dark. Our cameras may not be as good as our eyes but we can do a whole lot with those 10 to 15 stops.
The Bad News
Sadly though, we often do not get the most out of our cameras. We don’t fully exploit what they can do. This can be from not fully understanding how to exploit all of the potential. Sometimes we just settle for “good enough” and don’t make the effort. The camera and software companies compound this by pushing us towards “postcard” shots that are brightly lit without a lot of shadows or details. They want to give us eye candy when we look at the camera’s LCD screen or use auto processing in our editing software. In doing so, we often lose some that wide dynamic range we paid thousands of dollars for.
We sometimes try to compensate for the lost stops through techniques such as exposure blending or HDR processing. These are useful techniques when the scene’s dynamic range exceeds what the camera is capable of capturing. But why should we need them when the scene’s dynamic range is within the camera’s usable dynamic range? The answer is simple. We shouldn’t.
The Good News
Fortunately, there are a number of things we can do to help keep the full dynamic range our camera provides, collect as much data as possible to provide detail, and while we’re at it, keep noise to a minimum.
I’ve listed 6 actions below to achieve this. The first 5 are when we are taking the picture while the 6th is done in the beginning stages of our post-processing. The good news is that while they may be a little different than what we are used to doing, they aren’t that hard to do. After using them for awhile, we get used to them and they become second nature.
1. Shoot RAW
If you get a modern digital camera, the first thing all your camera club buddies tell you is to shoot RAW. The reason is that RAW files contain more data than than jpegs do. It gives you more options in post-processing. The downside is that RAW files are much larger and usually don’t look that great without post-processing. If you want to get the most out of your camera you need to shoot RAW and learn how to post-process them.
There are instances where shooting jpegs may be appropriate. Wedding, sports, and photojournalist photographers commonly shoot jpegs because the smaller files making them easier to share. Additionally, since they are in a “finished” state right out of the camera they can be delivered quickly with little or no processing. The bottom line is that you should shoot RAW to get a better quality image unless time is the more important factor. Here is an article that discusses this more fully.
2. Expose To The Right

Expose To The Right (ETTR) means using an exposure that will appear on the the histogram as far to the right as possible without clipping the highlights. The image is likely overexposed, but you can bring it down in post-processing with the least amount of noise. This is because the right contains most of the data, the left has the least amount of data. If you underexpose an image and increase the exposure in post-processing you will introduce more noise than you would by decreasing the exposure of an overexposed image. A lot of people don’t like ETTR because the image may not look good when viewed on the camera’s LCD screen. That doesn’t matter. What matters is what it looks like after you’ve processed it. Starting with an ETTR exposure will give you a better image because you have more data to work with.
3. Use A Neutral Picture Style
Checking the histogram in your camera is a common way to get a good ETTR setting. You can keep adjusting your settings until you get it just right. However, you have to keep in mind that the histogram you are seeing is a representation of a jpeg image in the LCD screen or EVF (electronic view finder). The jpeg is processed based on the picture style you set e.g. Standard, Portrait, Landscape, etc. Each will produce a different histogram. The picture style controls sharpness, contrast, saturation, and color tone of the jpeg. Picture style only affects jpeg and not RAW files. RAW files are just data files. To get the most accurate representation of the unprocessed RAW data use a “Neutral” picture style.
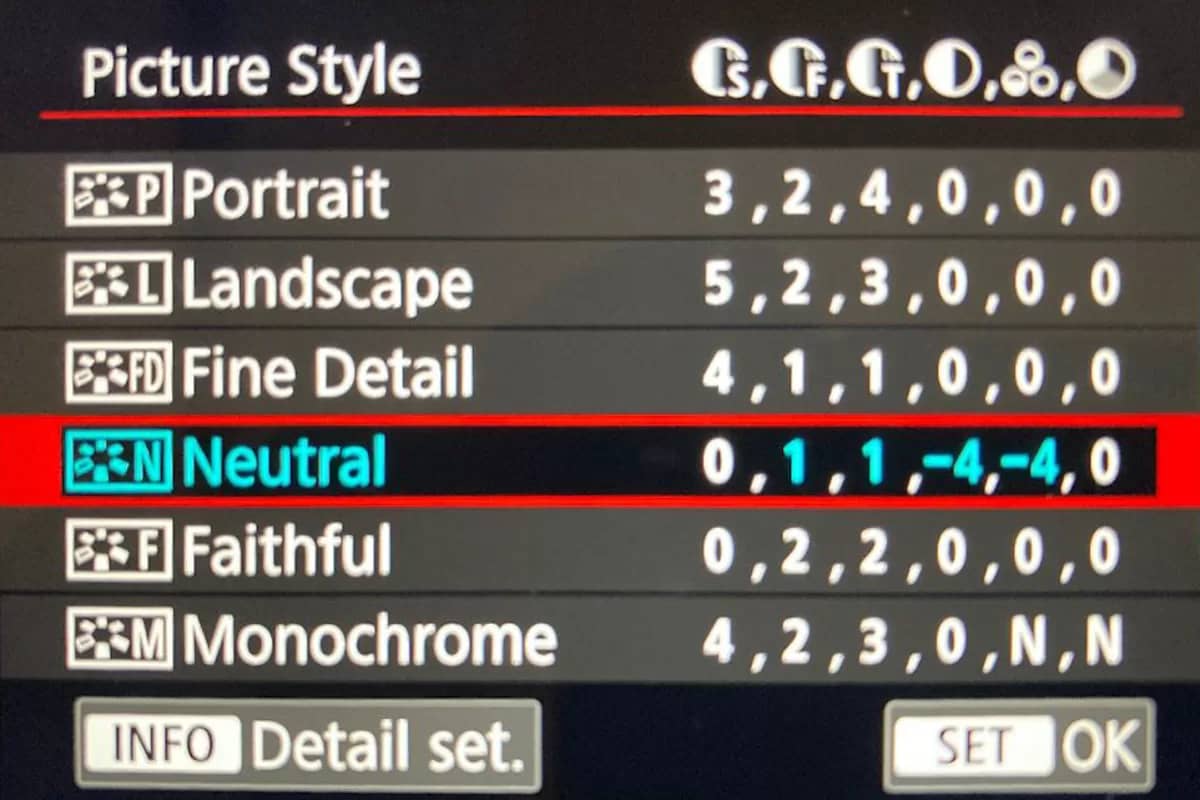
Additionally you can fine-tune the picture style components. I’d suggest setting sharpness, contrast, and saturation value to their lowest value and leave color tone at the zero setting. Using a neutral picture style allows you to get an ETTR exposure with the maximum amount of data. Keep in mind that what you see on the LCD screen or EVF will look overexposed and “flat”, lacking in contrast. However, I say again, what matters is what the image looks like after processing not what it looks like on the LCD screen or EVF.
Brand | Setting | Name |
Canon | Picture Style | Neutral |
Nikon | Picture Control | Neutral |
Sony | Creative Style | Neutral |
Pentax | Custom Image | Neutral |
4. Lower Your ISO
Most photographers know about the relationship of noise and ISO settings. Generally, as our ISO settings increase, noise increases. Therefore, we generally want to use the lowest practical ISO setting. What most people don’t realize is that there is also a relationship between ISO settings and the camera’s dynamic range. It’s an inverse relationship. As the ISO setting increases, the dynamic range the camera can record decreases.
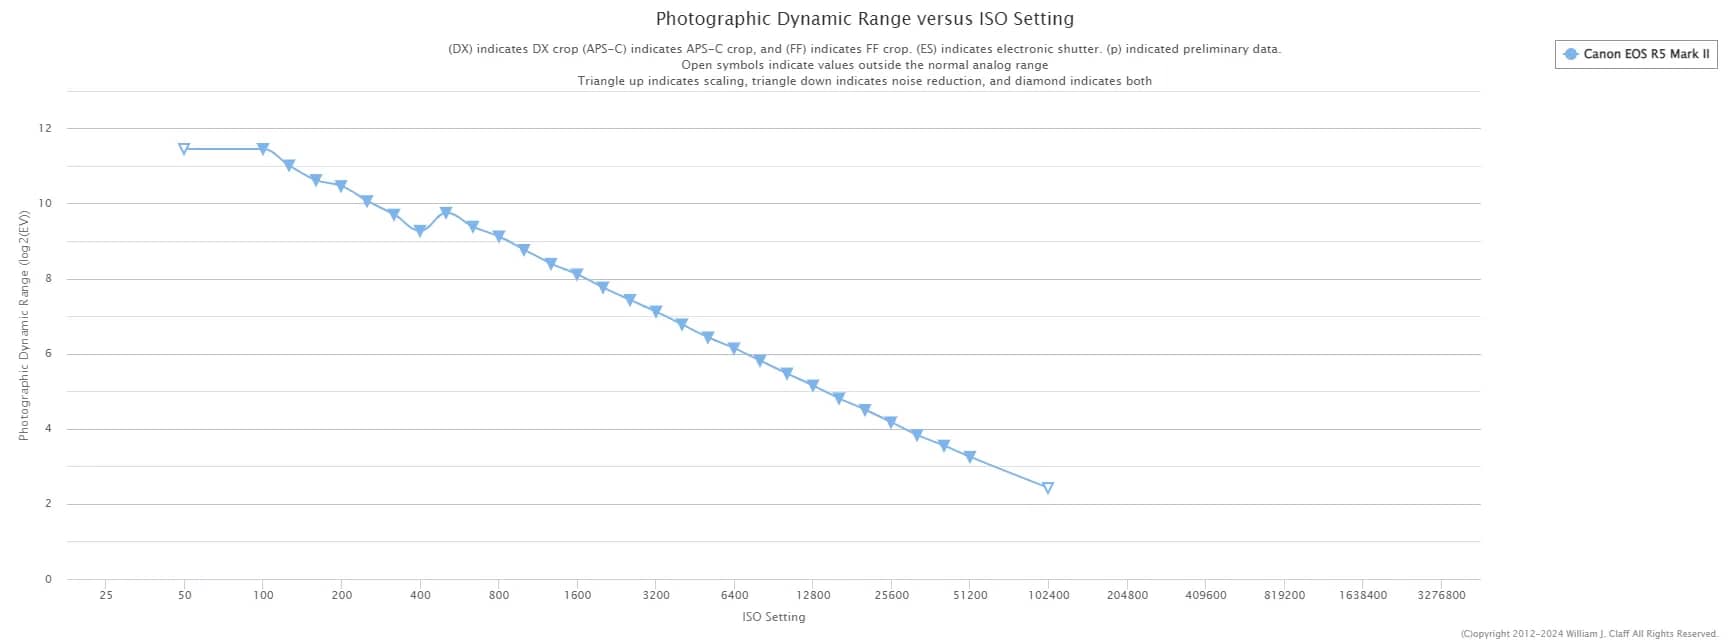
For example, going from ISO 100 on my Canon R5 Mark II to ISO 400 (a 2 stop change) also results in a loss of 2 stops of dynamic range. Those dynamic range numbers the manufacturers shown on the spec sheets are at the camera’s base ISO. We have to recognize it’s not a fixed value and act accordingly. It turns out we have 2 good reasons to use the lowest possible ISO setting; lower noise and a wider dynamic range capability. Find out how your camera’s dynamic range is affected by ISO at Photon To Photos.
5. Learn Your Equipment
While researching the dynamic range capability of the Canon R5 Mark II I found an article that showed the Mark II with its stacked sensor had a dynamic range penalty compared to the first-generation R5 without a stacked sensor. It wasn’t a large penalty, but it was a difference nonetheless. What caught my eye was that the choice of shutter, mechanical vs electronic, also made of difference.

The electronic shutter provides higher continuous shooting rates and can be done completely silent. The mechanical shutter as you might expect, has a slower continuous shooting rate and although it is pretty quiet it is not as quiet as the electronic shutter.
The difference I mentioned earlier is that based on the Photons To Photos data, using a mechanical shutter gives me more dynamic range than using the electronic shutter. It wasn’t a large amount, typically in the ¼ to ½ stop range. In looking at the noise information it appears using a mechanical shutter also gives me less noise than the electronic shutter mode.
Since I primarily shoot architecture, landscape, and street scenes using a mechanical shutter is no imposition for me. So, it’s an easy decision to go with the mechanical shutter. Every bit of dynamic range saved and every bit of noise reduction helps, no matter how small. For me, it comes with no real inconvenience.
The whole point of this is to suggest you read the manual and the online reviews. It’s a great way to glean information that you can apply depending on your shooting style.
6. Edit Your Photos With A Linear Profile
Okay, we’ve done everything we can to get a dynamic range as wide as possible and to collect as much data as possible. It’s time to start post-processing. Unfortunately, we often take all that good stuff and throw a bunch of it out as soon as we start the editing process. Whoa, say what?
That’s right, we go into Lightroom (or one of the similar software packages) and a develop profile is applied. Again, like the camera manufacturers, the software companies want to preprocess the image. They’re trying to spoon-feeding us eye candy again while taking away our options. So technically linear profiles aren’t about getting more out of your camera; they’re about keeping more of what you get from your camera so they go hand in hand with the above.
Camera Specific Raw Curve
(red line)
- Decrease highlight contrast
- Brightens essentially all pixel values
- Increases shadow contrast
- Creates an image that looks “familiar” with good brightness and contrast
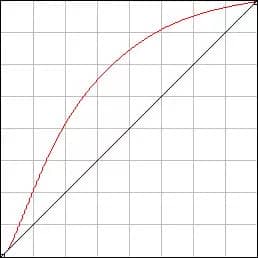

Linear Curve (dark line)
- Straight line
- Image is darker
- Image is “flatter”
- Closest representation of unedited RAW data
- Makes the most data available
- ETTR has greater potential for benefit
Source: Tony Kuyper – The Linear Profile: A new beginning in Lightroom and Camera RAW
The red line represents the camera specific RAW tone curve with the Adobe Standard profile applied to a RAW image. Like the neutral picture style we will get a flatter, less contrasty image when we apply the linear profile (the dark line). It will also be darker than we are used to seeing with the other profiles. The big thing is that we process the photo the same way as before. We just move the sliders more because we have more to work with. In turn, this means we can extract more detail from both the highlights and shadows. Who doesn’t want more of that capability?
I’ve seen one claim that linear profiles can recover 2 to 3+ stops of data lost with the manufacturer’s RAW curve. I believe the “recovery” of data is real, noticeable, and significant but can’t quantify an exact amount of recovery. Since most DSLR and mirrorless cameras capture a dynamic range of 10 to 15 stops, recovering 2 to 3+ stops, if true, is a big deal. While linear profiles really excel at extracting additional data, they can’t perform miracles. If you blow the highlights or crush the shadows you’re out of luck. That’s why steps 1 through 5 above are so important.
I was first introduced to linear profiles by Rick Hulbert, but I only used them when needed to extract more detail. However, after a discussion with Hali Sowle, I now use them 100% of the time. There is no downside, and using them 100% keeps you proficient in your use of sliders and they can help add detail even when you didn’t think you needed it. There is no downside!
You can get more info on linear profiles at the Tony Kuyper link above. In addition, he provides a link to get free linear profiles (they are camera specific) you can load to Lightroom and other software packages. It seem strange that Adobe doesn’t make these available in Lightroom. They provide lens specific corrections, so why not camera specific profiles?
Why Bother?
Some might ask, “Why bother with all this?” My response is why wouldn’t you bother to do this? It’s very low cost in terms of time and effort and can provide tremendous benefit. This has been a long blog post but it’s worth repeating:
If we get the most out or camera and keep it, we can get the most out of our photos.
Leave A Comment And Share
What do you do to get the most out of your camera? Do you have any suggestion of other actions to get more data or dynamic range? Please leave a comment in the comment box below.

