Getting Out Of Your Comfort Zone
“Get out of your comfort zone” is something we often hear. So much so, that it has become a cliché. It is meant as a way to learn and grow as a photographer, or just about anything else for that matter. In photography, our comfort zone is composed of our favorite subjects, compositions, and editing techniques. The more we do the same things; and the more successful we are with the resulting images; the more “comfortable” we get.
There’s a fine line between routine being a way to hone your skills and it leading to you “falling in to a rut”. Repetition can be good but too much can be a problem. How do you know when you’ve crossed the line in to the comfort zone? One way is to look at your portfolio as a whole. Are all your photos similar in terms of subject and processing, etc.? On one of the websites I follow, there is a photographer that has some fantastic portraits. After looking at them I noticed that while individually they were stunning; collectively they seemed the same. However, I quickly lost interest in looking at his new work. This was because it was a case of “if you’ve seen one, you’ve seen them all”.
My Recent Attempt To Exit My Comfort Zone
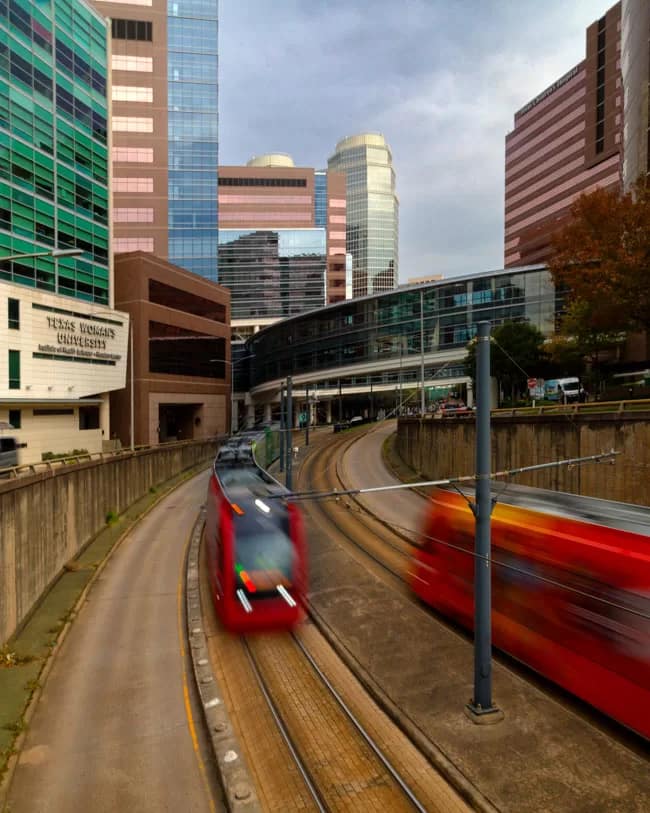
I recently went down to the Texas Medical Center to photograph the metro trains. The target was a view at the curve between an underpass and the heart of the med center. I knew what I wanted: motion blur on the trains, ant it had to include the architecture (especially the curving elevated walkway). Most of this is smack in the middle of my comfort zone.
The resulting image, while “nice” was also a bit mundane. I found it difficult to get excited about it. That’s when I decide to try editing in a way that was out of my comfort zone. After all, what did I have to lose. In addition, I might learn something new.
The Out Of the “Zone” Image
I’ve admired a number of photos I’ve seen on various sites where the photo looks like multiple exposures with each exposure being slightly misaligned. These create a sense of blur and movement but still retain some of the detail. Photos like this could be mistaken for ICM (intentional camera movement) but on closer examination that is not the case. I’m sure the camera wasn’t moved. Rather, it is through multiple exposure or overlays of a single exposure. I thought combining this for the entire image but keeping the slow shutter speed motion blur of the trains might work.
However, there was one big problem. I don’t know the process to make these kinds of edits. So, I improvised. Here is a summary of what I did. Although this may not be the “correct” process; it is one that worked for me.
- I created a new layer on top of the image and in Photoshop I used the blur tool to make a long vertical motion blur
- I then overlaid a number of copies of the original layer. Following this, I lowered their layer opacity and moved them out of alignment.
- I then merged these layers and using the eraser tool I exposed the trains in the original image.
I, of course, also did the standard edits of color, exposure, and cropping. Since this was a new endeavor I asked for critique from some trusted colleagues. Their feedback was extremely helpful in getting the image I was hoping for.
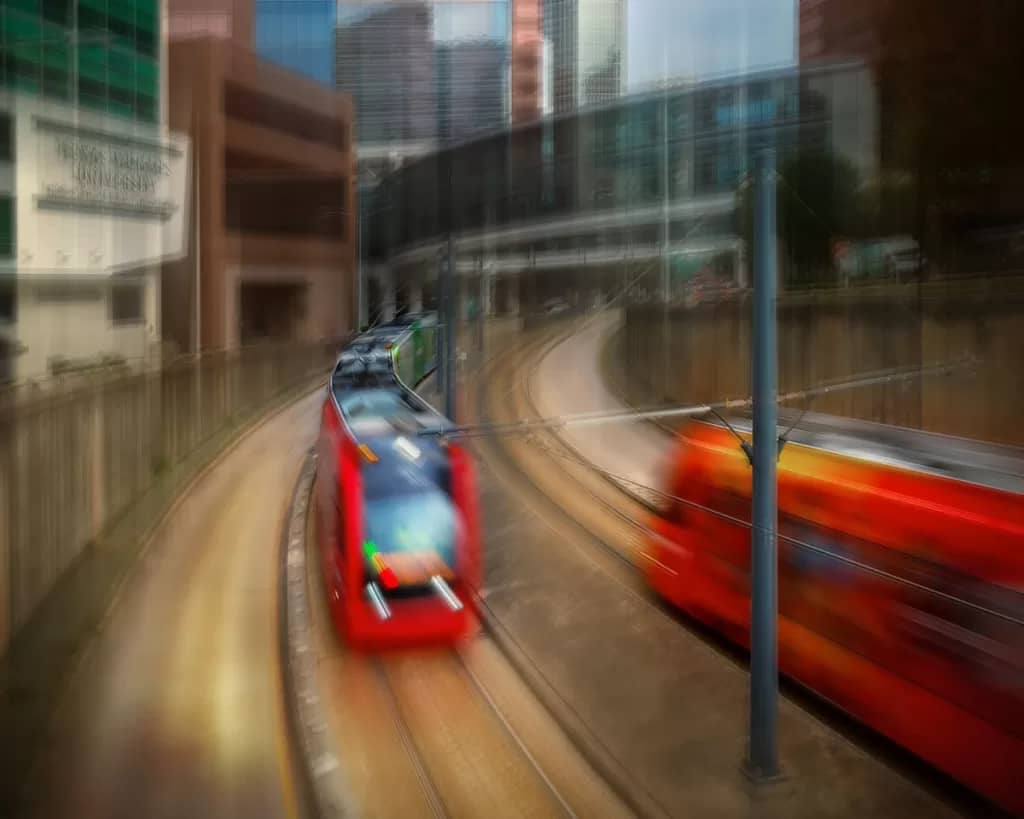

I’m glad I ventured out of my comfort zone. It was fun trying this and I may use this technique again sometime for the right photo. It’s always nice to have an extra arrow in your quiver.
Leave A Comment And Share
What have you done to get out of your comfort zone? I’d love to hear your comments and feedback. Please leave a comment in the comment box below.

