How To Make Custom Brushes For A Dispersion Effect

(Click to enlarge/purchase)
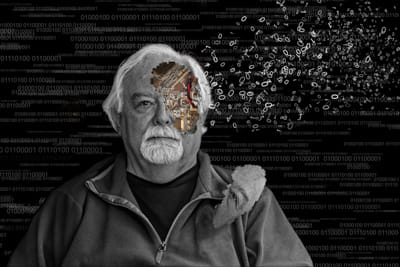
I had this crazy idea (yeah, I get those a lot) to create a photo dealing with personal data breaches. I had seen a number of photos with dispersion or explosion effects and wanted to incorporate that in my photo. This photo involved a variety of different aspects including: layers and layer masking, greenscreen, Photoshop fx tools, creating custom brushes, using the transform tool, and creating a dispersion effect. With this long list of aspects seems like it would be a very complex and difficult image to make. However, if you look at each of the aspect individually they are surprisingly not that difficult to do. Since discussing each aspect would make for a very lengthy blog post so I’ll focus only on how to make a custom brush in Photoshop. This will include using a pen table in conjunction with custom brushes to create a dispersion or explosive effect.
Why I Needed A Tablet
In looking at the various Photoshop brush settings I could see that I could do the things I had in mind: vary the size (size jitter) and angle (angle jitter), vary the scatter direction and amount, and vary the color (foreground/background jitter). The problem is I couldn’t get these to work just using my mouse. Looking at the settings and researching on Adobe and other sites I strongly suspected a pen tablet of some kind was required but couldn’t find any definitive answer on this. Luckily, a friend of mine, John Guild (pronounced ‘Giled’) is a Photoshop master. John quickly confirmed my suspicion and recommended the small size was as being sufficient for most purposes. Based on this I picked up a Wacom Intuos Creative Pen Tablet (Small, Black) for $80. John’s recommendation was spot-on in regard to going with the small tablet.
Creating The Background
I wanted a string of binary data going horizontally and varying in size and color (shades of gray). I wanted something similar to the data waterfall effect of the Matrix movies but horizontally to go with the dispersion flow.
Creating The Background Brush
I found a simple online text to binary conversion tool via Google and converted my text stream to binary (1’s and 0’s). If you are really interested in what the text stream is you can reverse convert it if you willing to enter all the data into a conversion tool.
Now the we have the text let’s discuss how to make a custom brush in Photoshop.
- Open a new transparent layer. To create a layer and specify a name and options, choose Layer > New > Layer and set opacity to 0%.
- Using the Type tool, selected a font style and copy and paste in the binary string
- Select the text, (the Rectangular Marquee Tool works nicely)
- Choose Edit > Define Brush Preset
- Name the brush, and click OK
Using the Brush
- I created a new layer and filled it with black at 100% opacity
- In the Brush Setting panel I adjusted the settings of Shape Dynamics, Scattering, and Color Dynamics and control method (I used pen pressure). You should experiment with these to get the desired effect. For my background a key element was to have the Angle Jitter in Shape Dynamics to 0% which forces everything to be horizontal.
- On the Wacom tablet simply drag the pen from the top edge to the bottom varying the pen pressure. You will the text string “painted” on in a variety of sizes, hues, brightness all depending on the settings you chose.
Creating the Dispersion Brush
The process for creating the dispersion brush (for the 0’s and 1’s floating off) is essentially the same as for the background with 3 key differences.
- The text is different – a long binary string for the background “text” versus a simple “0 1” for the dispersion
- The background layer is black with scattered text brushed on it. This is the base layer of the image. The dispersion layer is transparent (opacity = 0%) with the dispersion text brushed on it. The dispersion layer needs to be transparent as it will be on top of other layers of the image.
- The Angle Jitter of the text in background layers is 0% because I wanted it all horizontal. The Angle Jitter in the dispersion layer is 100% as I want them to appear floating off as if exploded out.
Conclusion
This is a very simplified summary of the process. There are lots of options and choices you can make depending on what outcome you want. The important thing is to experiment with it and play around with it. Have some fun!
What ways have you used a pen tablet and custom brushes in your photos? Please leave a comment in the comment box below.