Eliminate Halos – They Belong On Saints, Not In Photos

(Click to enlarge/purchase)
A halo was originally defined as a bright circle around the head of a person that signifies holiness. That’s great for saints but not for photos. Assuming you haven’t photographed a saint, halos are “unholy” in photos. They’re flaws. They don’t belong and we need to eliminate halos from our photos.
Halos appear as a thin line along the border of objects. The line is usually white or light gray but can be other colors when it involves chromatic aberration. Halos aren’t big, just a few pixels wide, but they can be very distracting. The particularly bad thing about them is that once you notice them you can’t un-see them. A viewer’s eye keeps going back to them and away from the subject where you want to focus the viewer’s attention. Most often, you see them along the horizon, at the edge of the sky as it meets the earth or even buildings. However, they can appear other places where contrasting objects meet.
Whether you’re taking shots to simply share on Facebook or trying to make fine art, halos are a needless technical flaw. There is a lot you can do to prevent halos and if that fails it’s easy to fix. Make it part of your routine to eliminate halos from your photos.
What Causes Halos And How Do I Prevent Them?
There’s a long laundry list of reasons halos seem to pop up. In terms of prevention the easy answer is, if you know what causes the problem just don’t do that. Not a very satisfying answer at all is it? Sometimes you really need to do those things. Are halos just the price you have to pay? Fortunately, no. Let’s take a closer look at some of the causes along with preventive and remedial actions to eliminate halos.
Chromatic Aberration (CA)
Chromatic Aberration (CA) is a result of the lens not focusing all of the colors at the same point on your camera’s sensor. Typically, this results in purple or green halos (a.k.a. fringing) but other colors are possible too.
As this is a lens related phenomenon there are some thing to keep in mind about lenses:
- Used the highest quality lens (ideally with flourite coating) that your budget will allow
- Try to avoid the extreme focal length (short and long) when using zoom lenses
- Stop down your aperture if possible, to prevent longitudinal CA. You’ll need to compensate by increasing exposure time and/or increasing ISO
Other actions include:
- Avoid high-contrast images as they are the most sensitive to CA, but what’s the fun in that?
- Prevent lateral or transverse CA by placing the subject away from the edges and composing so that you can crop in from the edges where this type of CA occurs.
Remedial actions include selecting “Remove Chromatic Aberration” in Adobe Lightroom and other software packages. Tip: Create an import preset to automatically do this every time along with selecting “Enable [Lens] Profile Correction”.
If all else fails switch to Manual Lens Correction and adjust it there to eliminate halos induced by CA. Photographer Leonardo Papèra both has an excellent article that explain CA causes and cures in more detail.
Over Use of Sharpening or Clarity Adjustment
Both sharpening and clarity impact edge contrast. Overdoing the use of either can cause problems. Sharpening will darken the pixels on one side of the edge while lightening pixels on the other side. The extent of these is determined by your sharpening radius setting. If you notice haloing occurring decrease the amount of sharpening you’ve applied and/or the radius until the halos disappear. Clarity works in a somewhat similar manner to sharpening by adjusting contrast at the edges but produces larger (and more noticeable) halos than sharpening. A better approach is slight clarity adjustment on a global basis supplemented with more significant clarity adjustment done in specific local adjustment.
Pushing Dynamic Range Processing Too Far
High Dynamic Range (HDR) processing can produce halos if pushed too far. Hmmm, I seem to notice a trend in regard to over-doing things. HDR is using software to blend multiple photos each with different exposures into one image with a full dynamic range of light. We are blending segments based upon light and contrast and sometimes we get conflicts at the edges resulting in halos. As with many things in life, moderation is the key to success. The more extreme your use of HDR the more likely it is you’ll get a halo. A far as remediation, I’ll defer that to the when I discuss the “when all else fails” solution that applies to more than just the HDR issue.
Misaligned Masking
There are times we need to make local adjustment and decide to select and mask a certain portion of the image. If you increase the exposure, we may find we now have a halo around the object. Not having a good selection can cause this. When viewing the entire image on the screen the selection may look fine. However, if we go to 100% viewing we may see that the selection contains more the we wanted so instead of increasing the exposure of the just foreground we’ve also included a small sliver of the sky at the edges of the foreground.
Be sure to use the “Select and Mask” feature of Photoshop to check how good your selection is. You can use this feature to refine the edge as needed. Another quick way to adjust the selection in Photoshop is to go to Select>Modify>Contract (or Expand). You can shrink or grow your selection by as little as 1 pixel to fine tune it. This assumes, of course, that the selection uniformly follows the edge.
Lowering Luminance Too Far
If we lower the luminance of a particular color such as lowering the blue luminance to darken the sky, we can also cause halos. Near the edges we have a mixture of the sky and the bordering object in the pixels. Only the pure blues are affected by the change in luminance but not to the other edge pixels causing a halo to form. Here we go again, – it’s all about moderation, people!
Blind Acceptance of Presets
Presets are extremely useful tools in post-processing. Adobe Lightroom and similar products have them and there are additional add-on products that expand the universe of preset choices. Presets can shorten our processing time by quickly getting us to a starting point close to final product. Keep in mind they are just that, a starting point, not the final destination. They are generic in nature and not tailored for our particular image. As a result, many of the things we’ve discussed above may be baked into a preset and blindly accepting a preset may bring with it unwanted halos. Review the settings within the preset and closely check the image before accepting the preset results.
What’s The Big Deal? The Halo Is Hardly Noticeable.
When you look at your image on the computer you may not notice halos nor think they are a big deal. It’s a choice you have to make. Do you want to make a great photo or one that’s “good enough”? Which one do you want hanging on your wall? Personally, I strive to make great photos even though I don’t often succeed. As I wrote earlier,
I believe that the difference between a great photo and a merely good photo is in the details. It’s doing all the little things right. It’s putting in the extra effort rather than settling for “good enough”.
If you want to be a great photographer it all starts with being willing to try to be a great photographer. I believe a part of the “trying” is making the small effort to eliminate halos.
Look at your photo at 100% magnification even if you’re only planning on viewing them online in a much smaller size. You might be surprised how halos become very noticeable (and dust and sensor spots too!). It’s okay if people don’t like your photos based on artistic merit or their personal taste. We shouldn’t give them an opportunity dislike a photo because of technical flaws. Make no mistake about it, halos are flaws, pure and simple.
So yeah, my belief is that halos are a big deal. This is especially true as they aren’t that hard or time-consuming to prevent and/or fix.
If All Else Fails
If you couldn’t or forgot to prevent halos there is a very simple and quick fix to eliminate most halos. In Photoshop. select the Healing Brush Tool (not the Spot Healing Brush Tool) and in the menu bar at the top set the mode to Darken. Use a small brush and sample [Alt-click (Windows) or Option-click (MacOS) ] near the halo. Then simply paint the halo. You can also use the Clone Stamp Tool in the same manner. This should work for most halos with the possible exception of CA halos.
This mode takes anything lighter than the sample and darkens it by filling it with the sample. Anything that is darker than the sample is unaffected. You can paint along the edge without having to be super careful about the edge line so it is very quick. If there are lighter areas embedded in the dark are near the edge you do have to be a bit more careful there or else they will get painted but still this is easier and much quicker than trying to “color within the lines”. The simulation shows how this works. The center circle represents the tool painting with the sampled area.

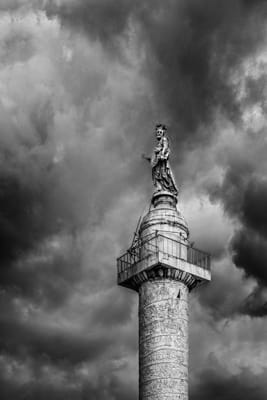
For an example, I’ve shown the before (with halos) and after (without halos) for a full-size segment of the photo at the top of the post. While prevention is always better than remediation this fix took less than a minute for the entire photo. There is really no good excuse not to eliminate halos in your photos.


Leave A Comment
I’d love to hear your comments and feedback on this post. I hope it was helpful.
What’s been your experience with problems with halos in photos? Please leave a comment in the comment box below.